Video-based learning proves a widely accepted e-learning trend recently thanks to its various benefits. They hold your learner’s attention, take less money compared to offline learning, and free students from commuting to classes.
However, any benefits have their trade-offs, and so do training videos. While providing video courses, you’re facing a digital piracy problem too. Students keep sharing your training vid with others without your permission. It’s estimated that online video piracy has blown $47.5 billion in US gross domestic product per year.
It’s crucial to protect your videos from unauthorized users. There are numerous methods enabling you to secure your recording. You can either disable right-click, add watermarks to the video, or use a video sharing service.
Have you ever heard about selling videos without enabling buyers to download them? This simple yet powerful method helps you secure your video training materials effectively. You can protect your courses with 2 different layers.
In this tutorial, we’ll look at 3 steps to sell video courses to learners but block them from downloading these videos. Before we start, let’s briefly cover some major reasons why you shouldn’t allow customers to download your videos.
Why Stopping Customers from Downloading Video Courses

As mentioned, digital piracy in general and the video stealing problem, in particular, directly affect your sales and revenue.
Imagine you spend 3 weeks or even 3 months researching and producing a tutorial video with useful knowledge. But it takes thieves only 3 seconds to download it for free.
Then, they share the course with their friends, relatives, or social groups. Consequently, you lose a lot of customers and a huge amount of income. So how do you feel at the time?
This raises a question. If learners don’t own the file URL and don’t have the right to download it, does it mean they won’t be able to send it to other people?
This solution seems similar to the disable right-click method. In fact, it takes your video security to a higher level. Even though you already prevent video content selection, users with good technical knowledge can still use the Inspect option to take your videos.
Recommended for you: Importance of Video Production in Business.
How to Sell Online Video Training but Block Downloads

The process is the same as how you offer a digital product for sale in WooCommerce. You need to create a product page, then add your video to that page and sell to customers. But before adding the video there, you have to protect it from unauthorized users.
To make it easier for you to follow, we break the process into 3 steps:
- Step 1: Add the video to a WordPress page and at the same time protect that video using the PDA Gold plugin and Protect WordPress Video extension. This prevents students from accessing your video with the direct URL and downloading them.
- Step 2: Secure the above page with a password to block unauthorized access. If you don’t protect this page, all types of users (both paid and unpaid ones) can view your video.
- Step 3: Sell this password-protected page via WooCommerce. Once checking out, your students just need to click the link displaying on the order page so they can go to the page embedding the protected video course.
It sounds complicated, and to some extent it is. But you won’t face any issues if you carefully read the guide below.
Step 1: Embed Your Video into Your Content and Protect It

Firstly, you’re required to install the PDA Gold plugin along with Protect WordPress Videos extension. Both plugins allow you to embed your video in WordPress content and prevent users from accessing it directly via the URL.
After that, head to the Pages section and choose Add New in your admin dashboard and add a new WordPress page.
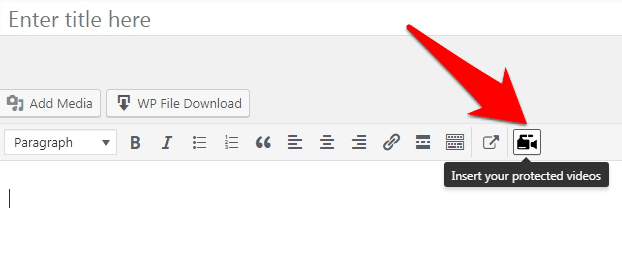
A new video camera icon is added to your toolbar in the edit screen. Click here and insert your video file to the content.
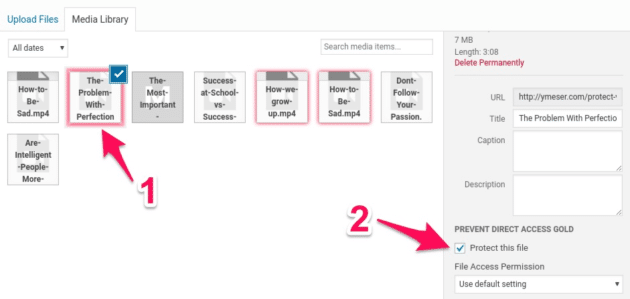
Now, there is a popup for you to choose which video to display on the page and protect. You need to hit the “Choose video” button and pick one from your Media Library.
Select your desired video in the Media Library and check the box “Protect this file” in the file details section. This box is created right after you have the PDA Gold plugin ready on your site.
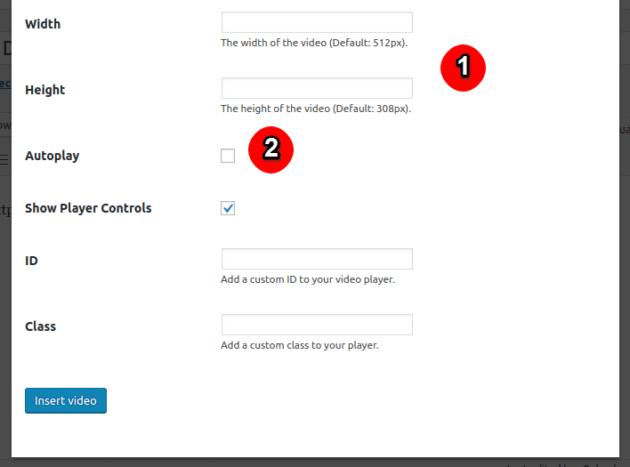
You can adjust the width and height of your video when showing it on the page. Enabling the Autoplay option frees users from clicking on the video to watch it again.
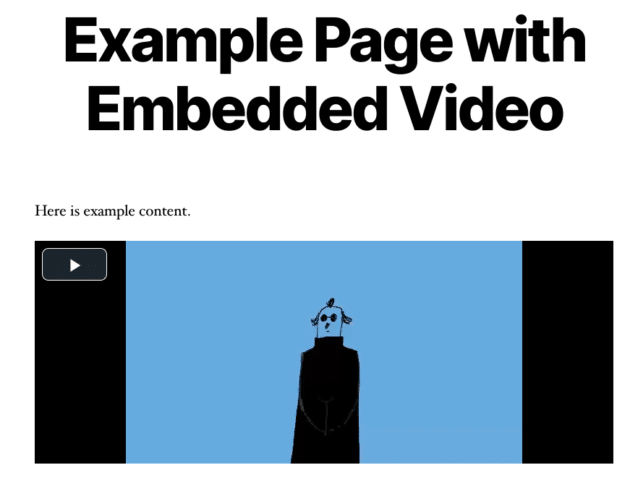
Remember to click on “Insert video” to complete this embedding video process. Here is how your page looks after embedding the video:
You may like: 12 Career Opportunities in the Video Game Industry.
Step 2: Password Protect the Page Containing the Embedded Video

Once you insert the video into your content and protect that video, the next step will be securing this page with passwords for later to sell it. Password Protect WordPress (PPWP) Pro plugin is your ideal tool.
The plugin allows you to lock your product pages with passwords. In other words, customers have to provide the correct password to view their purchased products.
Different from the default password protection feature provided by WordPress, the PPWP Pro plugin gives you a helping hand in creating access links to bypass your protected content. Instead of entering passwords, users will be given a special link granting them access to the private page.
This feature is useful in many cases. After purchasing the password-protected page via WooCommerce, you can send customers this link enabling them to open the protected content.
The following guide shows you how to protect the page containing your private training video:
- Install the PPWP Pro plugin for your WordPress site.
- Click the “Password Protect WordPress” section on your navigation menu and open General Settings.
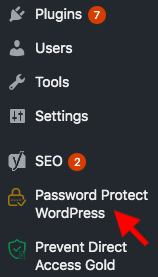
- Under Post Type Protection, choose “Products”.
- Go to the page you’ve just inserted the video in step 1.
- Enable the “Password protected” option in the Password Protect WordPress field.
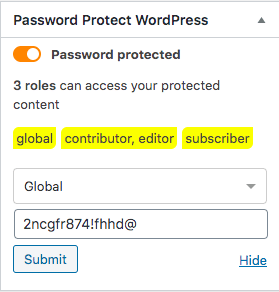
- Input your password and hit Submit.
You’re permitted to lock a page with multiple passwords as well as applying roles to your passwords. While global passwords permit every user who has the right password to see the content, the role ones force users to log in with the correct role before entering passwords.
Step 3: Use WooCommerce to Offer the Protected Content

It’s time to move to the last and the most important step: selling the private page that you embedded your video course.
This step requires you to install the WooCommerce Integration extension to auto send the quick access links of your protected page to purchasers.
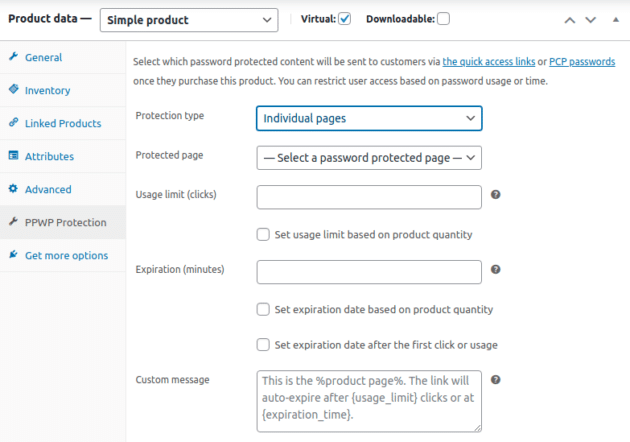
- Click on Products → Add New to create your WooCommerce product page.
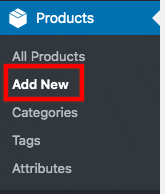
- Fill in the page with necessary information such as product title, description, and featured image.
- Move to Product data at the bottom of the product page.
- Choose “Simple product” and check “Virtual”.
- Head to PPWP Protection and navigate the settings.
- Protection type: Select “Individual pages”.
- Protected page: Pick the page you created, embedded the training video there, and password-protect it in previous steps.
- Usage limit (clicks): Enter the times students can use the quick access links to view your video. After that, they just see a 404-error page.
- Expiration (minutes): After this period, learners will find it impossible to open the protected page with the video.
- Custom message: Show buyers the quick access links to the password-protected page that includes your video course along with its usage limit and expiration time. You should provide your real product name or video title in the %product page% part.
- Publish this WooCommerce product page
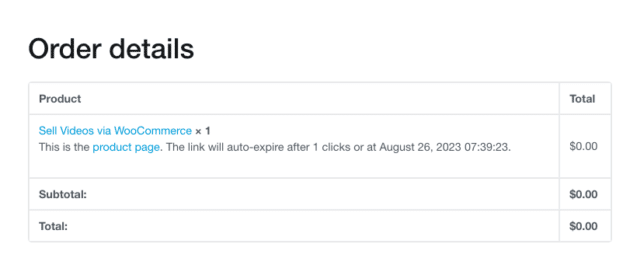
That’s it! Upon purchasing, customers will see the order details with the link to their videos on the thank you page:
You may also like: YouTube Mid-Roll Ad Breaks are Now Available in Shorter Videos.
Protect Video Courses Made Simple

Selling video courses online is simple. However, protecting them from unauthorized users is not always an easy task. Lots of people are attempting to steal your hard-to-product intellectual work and share it with others without your notice.
It’s necessary to protect your training video from being downloaded. Students are allowed to view it after purchasing only. As a result, you can block them from getting the video links or downloading videos to their devices, and sending these videos to others.
We’ve shown you 3 steps to easily protect and sell your video courses via WooCommerce. If you still have a question related to the process, just comment to let us know.
This article is written by Suzie Wilson. Suzies calls herself a WordPressaholic who loves writing for WordPress users. Before shifting to a content writer, she was a content researcher with SEO knowledge. Suzie is now a content writing machine about WordPress plugins and tutorials that still believes she’s going to be an astronaut one day. You can follow her on LinkedIn.
