So, you have decided to take the plunge and creating your business website. But, where do you start? You could pay someone to handle it all, you could do it all yourself, or follow an in-between course once you know the sequence of steps to take. Even if you are going to outsource the whole shebang, it is better to understand the process.
Day 1 – Understanding Your Target Audience and Value Proposition

Creating value is the goal of a good blog. It is often a subtle balance between what is important to you and what is important to your audience. But in the final analysis, you need to create a sense of value for your content so that your readers will return. Getting someone to read your blog once is a start. But the goal is to get repeat readers so that they can’t wait to come back and see what you will include next.
To do this, you need to figure out what is most important to your audience based on social media posts, inquiry emails, and so forth. If you do not have a following or a business yet, you will have to picture your audience in your mind and clearly define what you are about.
Recommended for you: How to Rate the Design of Your Website if You are a Non-Designer?
Domain Name Thinking – Creating a Brand Name and Registering Your Domain

Your domain name is what customers will type into their web browser to find your website. It is also called the URL.
As you are defining your brand or your purpose in your blog, you need to create a brand name and domain name for your brand. Branding is often more important than marketing, as pointed out by Blogging.org, a leading digital marketing company that focuses on WordPress and content creation for business growth. Among many other things, they distinguish between the two by showing the many different ways you can either come up with a new and original domain name for your site, or how you might want to acquire it through different means — such as an online auction, a domain broker, or even an expired domain marketplace.
Registering your domain name is a key aspect of branding and it should be done in a way that is both interesting and engaging to your potential audience. It’s also a decision that you are likely going to be stuck with for the life of your blog, brand, or business — as it’s not something that can easily be changed. Choose your domain wisely and try to stick with one of the major TLDs.
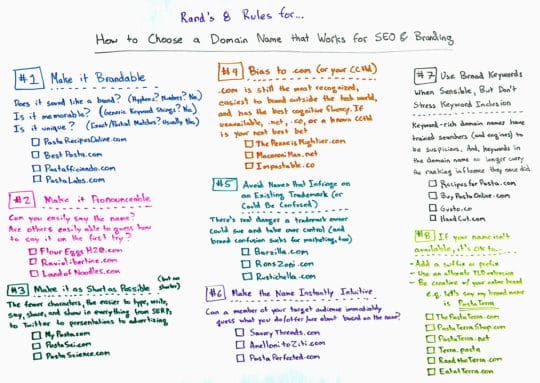
The screenshot below is from Rand Fishkin’s Moz.com Whiteboard Friday. It gives you some idea of the complexity of your task.
Your domain name/URL should:
- Be short – So it is easy to type.
- Tell people about your business – JonesThePlumber.com is better than TrevorJones.com.
- Try to be a .com if possible – The only exception is if you are only aiming locally when e.g. a co.uk or similar country-level domain name will work.
- Be easy to pronounce – So customers can pass it on to friends easily.
- Be easy to spell – So people get to YOUR site (avoid triple letters e.g. JessStiching.com).
- Avoid trademarks – You cannot afford the legal fees.
- Match your business name – It makes building your brand easier.
- Be saleable – Because you might want to sell your business and its website at some point.
Day 2 – URL Purchase

Hopefully, you have narrowed down your list of possible URLs to just three or four.
Now is the time to search to see if your favorite web address is available. It is essential to follow this search procedure to the letter because any other way allows ‘domain sitters’ to see your searches: They then buy the domains you were looking at in the hope of blackmailing you into paying ten times what you would originally have paid. Just buy the one domain name you need. You do NOT need to buy variations and misspellings of your web address. Nor do you need to buy .net, .info or similar variations on your name.
Day 3 – Website Planning

I know you don’t have a website yet, but you need to think about it before you start thinking about hosting.
Who are your dream customers? Where do they live? What are you going to put on your site? Do you want to be able to maintain your site and make changes yourself? How much support will you need?
If you are selling to Europeans, then it is a good idea to host your website on a server in Europe for maximum consumer security and trustworthiness. This will also make your pages open faster in EU countries than if you use a server in the USA.
If you plan to make heavy use of video, then you will need to pay more for hosting that will cope with the extra demands video places on the server.
You will almost certainly want to update your site yourself. WordPress websites are simple to make changes to, but they do place heavy demands on servers. So, ultra-cheap hosting packages will not cope well, and you may need to pay more.
24/7 Support is expensive and the lowest cost hosts often cut costs in this area. You ARE going to need help, so make sure your host offers 24/7 chat support as a minimum. Email support is a waste of time.
Day 4 – Hosting Research
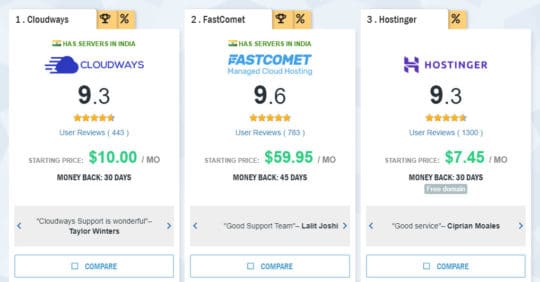
Most new website owners search for website hosting services for their business. You can find free hosting, but it really isn’t up to much. Low-cost hosting is usually on a shared server, and it can be slower than more costly hosting. Another option would be choosing a cloud hosting plan which is more pricy but safer than shared hosting. There are some good deals to find the best cloud hosting services, especially if you use a review site – See below.
You may like: SEO and Web Design: How to Make Sure They Go Hand in Hand?.
Day 5 – Install WordPress
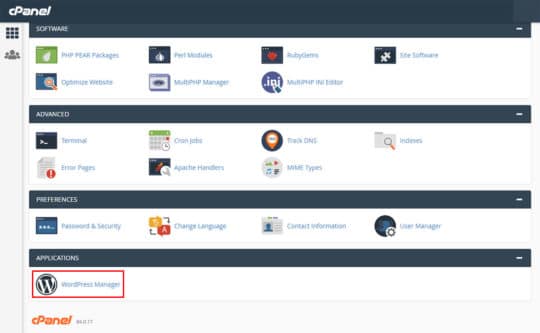
It takes about two minutes. The screenshot below shows what your control panel will look like in SiteGround hosting.
Image source: cPanel.net.
Once you have the software installed on your domain, you will need to change a few settings so check out this guide from WordPress.org which is excellent.

Day 6 – Add Your First Three Pillar Content Articles
Your content needs to show the world what value you bring to them. If your content isn’t grabbing what is unique and necessary behind your business nobody is going to have the time to stop and look.

Here are some important facts about creating pillar content. Pillar content is defined as:
“A content pillar is a substantive and informative piece of content on a specific topic or theme that can be broken into many derivative sections, pieces, and materials. Examples of content pillars include eBooks, reports, and guides.” – Anne Murphy from Kapost.
TIP: Use eBooks, reports, and guides to really boost attention for your content. Also, link out to these digital media assets in your blog where appropriate.

Day 7 – Having an Effective Content Marketing Plan in Place
No matter how much fervor or enthusiasm you have for your content, you need to have an effective content marketing plan in place in order to be successful with your blog. You need to think “branding” all the time, even if you are not in it for the money. But creating a brand name and getting a matching domain will increase your chances of improving your branding so that more people will notice you.
Remember, there is a big difference between general traffic and quality targeted traffic. Quality traffic comes from narrowing your audience with your pillar content. Define your brand in such a way that it captures the attention of your target audience.

TIP: Brainstorm several ideas and then write an eBook even before you launch your brand. If you have a book to your name, your brand will carry a lot more weight than if you are just individual writing about your hobby.
Whatever your purpose in your blog, it will shine through when you remember the 3 key mantras of a good blog:
- Define your brand.
- Narrow your focus.
- Promote through marketing.
If you are consistent with all of these ideas, you may see your brand soar in the future. But remember there is no “get rich quick” that really works. Daymond John refers to “the daily grind” in his book with the same title. It’s not the dream but the daily work that gets you to your goal.
You’ll get there one step at a time.
Going Live

Before you launch your blog, make sure you have covered all the bases and started working on your branding on all platforms you are affiliated with. This way, when people search for content with your keywords, they will also find your website, social media pages, and other links that you need to promote your brand. When you are ready to launch or “go live,” make sure you know what you want to focus on. Your first post often gets the most attention. So make sure you introduce a topic that is likely to get comments and a high level of engagement.
You may also like: Key Factors to Add to Your Website Design to Generate More Leads.
The Short Version

You can buy a domain name and set up your own hosting and website in less than a week, and that isn’t even working all day every day. Hosting will be your biggest cost, so do your research. Check out what other business owners have to say about different web hosting companies before you buy.
Moreover, the default interface of WordPress is not very user-friendly, so you’ll need to optimize that according to your desire. Similarly, as you change the setting on your laptop and phone to make it more comfortable to use.


