Setting up a WordPress theme can be a complex process, but, if you are aware of the ins and outs of WordPress, then installing a theme can become as easy as ABC. However, there is a catch: it is a time-consuming process! So, you do not want to waste your time trying to install or setup a theme through an incorrect process.
For your convenience, we have compiled this quick guide that will tell you about every little detail that you need to know in order to set up a theme. So, without further ado, let us get straight to it!
Visit the Themes Directory

Deciding upon a theme can be extremely difficult. But, if you want something that will not cause any development or coding issues within your website, you need to visit the WordPress official theme directory. This section contains all the themes that have been approved and acutely inspected by WordPress for guidelines compliance. Also, they are free to use.
Among a plethora of free WordPress themes available for install, choosing one that complements your website can be a bit complicated. This is where you can use WordPress theme search functionality to look for appropriate themes. However, this will only come in handy if you know the style or name of the theme you like. According to your entered query, the search results will be narrowed down to display only the relevant themes. Once you have selected a theme to install in your WordPress site, you can move on to picking a layout format, your site’s subject along with the features you need.
For more inspiration, you can browse the Most Popular Themes, Featured Themes, and Latest Additions’ sections for more options. If you like, you can also go through the paid GPL themes. Although this option comes at a price, they come with additional support and are compliant with WordPress General Public License.
Recommended for you: 11 Excellent On-Page SEO Plugins for WordPress You Should Consider.
Visit WordPress Admin to Install and Activate Themes

Have you found a theme you like? Perfect! Now, you need to install and activate them from your WordPress admin section. The basic steps which you will follow are mentioned down below:
- Open your WordPress page and log in to gain access to the admin panel. Once you are in, open Appearance and choose Themes.
- To add your favorite theme, locate and click Add New option. You will have two options to add a new theme. In case you know the name of the theme, you can look it up in the theme directory. If you do not know the name, you can use the Feature Filter option to narrow down your theme search. Then, choose the Apply Filter and locate the theme that meets your criterion.
- To unlock any theme, hover over it and choose the Preview section to see how it will look on the WordPress website. If you like the theme, you can choose the Install option. Once you have installed the theme, you can activate it by selecting the Activate link.
Installing WordPress Themes from Third-Parties

If you do not like the themes available in the WordPress directory, you can purchase it from external developers. When opting for this method, you will need to upload it before the installation process. You can achieve this through the following method:
- Download the theme in .zip file.
- Then, go to the WordPress administration area, click Appearances, then Themes. Here, you will find an Add New option. Open it.
- A new option will pop up which will allow you to upload the theme. To complete this action choose Upload Theme.
- Then, a form will open with a Choose File option. Click it, choose the theme’s .zip file and press Install Now.
- Once you are done with that, you can go to your WordPress admin panel and activate the theme. For this, go to the admin panel, open Appearances, and then select Themes directory. Here, find your theme and hit the Activate link button.
Installing WordPress Themes through FTP

File Transfer Protocol (FTP, wiki) is a complicated method of uploading and activating themes. So, it is better for WordPress savvies to proceed with this method as there is always the threat of accidentally deleting or modifying the existing theme files. But, if you want to test this method out for the sake of testing something new, we recommend that you go through this article first, then proceed with the FTP method.
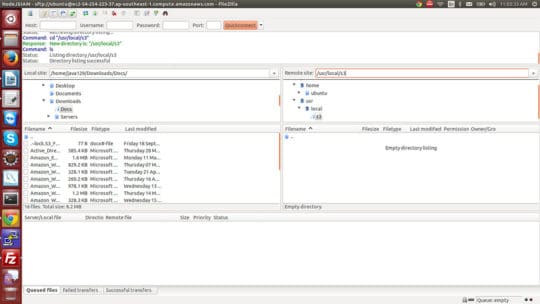
To initiate the FTP method, you will require an FTP hostname, password, and username. You will also need an FTP client. For the purpose of this section, we will be using a dummy client FileZ to elaborate the steps.
- Launch FileZ and enter your credentials to gain access. Then, click Quickconnect.
- A new window will pop up which will display Remote Site along with a root directory. Then open root directory, then web/content/wp-content/, and finally, themes.
- Open Local Site Window and select the folder that contains your theme(s). Hover on your theme, right-click, and then choose Upload.
- With the previous step, you will have successfully uploaded your theme to WordPress. Then, login into your WordPress admin panel, open Appearance and then select Themes. From there, hover over the theme and hit activate.
- With this, you will be done. Now, you can go to your WordPress site and see if the theme compliments your site design or not.
You may like: Top 7 WordPress Development Tools for Power Users.
Applying Template to Each Webpage

After successfully installing and activating the theme, you need to set it up according to your requirements and site design. For this purpose, you need to apply the theme template to each page individually. You can do this with the help of WordPress Page Editor.
- Open WordPress Page Editor. In the case of applicable templates, you will find them all in the Page Attribute section.
- Choose the template and preview it. If you like how it mixes up with your website design, then finalize the step by saving it.
- Once you are happy with everything, you can click Publish to finalize your settings.
Updating Your Themes

Installing and activating themes is only a job half done. You also need to keep an eye on the regular or occasional updates in order to increase your site’s security. But, before you initiate the updating process, you need to ensure that everything is backed up. You can find all the back-up procedures here.
It is possible that the constant updates may drive your site out of whack. Your site may break, customized pages can be rendered useless or certain settings can be lost during the updates. To counter this issue, you can create a child theme.
A child theme is a copy of the parent or original theme that retains all of its functionality. It is used when it comes to introducing advanced changes to any theme file. It can also come in handy when it comes to updating your themes since it copies all the functionality and style of the original theme.
What if Something Goes Wrong?

Every WordPress website is different from one another. It is due to the different customization, settings, plugins, and hosting options. Encountering any problem while installing, activating or updating the themes should not cause any serious concern as it is pretty usual. However, you need to go over a few areas to make sure your theme becomes compliant with your site design. For this purpose, you can follow our two-step process.
Contact Theme Developers

If you are using free themes from the WordPress directory, you can solve your problems by contacting the WordPress help department. Also, you can choose the WordPress Support Forum to have your questions answered by professional developers.
In case you have bought your theme from third parties, you need to contact their support for any issues. Keep in mind that free themes from third parties will not get you any kind of support since most external developers only offer support to premium customers.
When getting professional help, make it easy for the helping party to help you. You can do this by including every major and minor detail about your issues in the support forum. Be comprehensive, share your purchasing details and you will be good to go.
Hire External Services

If all else fails, you can hire an external development team. This is a costly option and we would recommend using it only as a last resort. There are various WordPress web development services that will be happy to provide you with a solution regarding your theme’s issues.
When opting for this option, do not try to cut corners by hiring shady services to do the job for you. The lack of experience or the right solutions could end up costing you more. So, invest in the right support solutions, and if possible, always opt for premium support whenever dealing with third parties. This will also cost money; however, it will be worth every cent.
You may also like: Top WordPress SEO Plugins for Better Ranking Website.
Wrapping Up

With this, we conclude our beginner’s guide of WordPress theme installation. We hope that you will find all the sections useful when it comes to installing and activating your desired WordPress themes. We have tried our best to cover every smallest detail of the process, but if you manage to find something missing from the guide, feel free to inform us about that particular section.
This article is written by Nouman Ali. Nouman is a digital marketing expert from Dynamologic Solutions for many years. He considers bringing all the keywords to the top of his duty and constantly strives hard to achieve the best result. Along with finding & implementing content optimization strategy, he is also fond of writing interesting blogs on SEO & digital marketing related topics.


